Tuesday, January 29, 2013

Still here!

Well... Happy New Year, everyone! Did you think I'd fallen off the face of the Earth? Well, I haven't. I've just been... well, REALLY really busy. There's been a lovespoon class, holidays & travels, health care, a little bit of ACTUAL winter, LOTS of design, and lots of carving. And chocolate! Regardless, I do apologize for neglecting checking in here.

Well,  let's see... where to begin?! Hmm... in November, I taught my very first "Carving a Lovespoon" class at my local Woodcraft store. It seemed to have gone very well, and in fact, I have another scheduled for April. It was really interesting to see the variety of students, and what they accomplished. Lots of nice spoons - and lots of getting daring with the challenges I was aiming to include in the designs - Good job, students, and thank you, Woodcraft!!!

Then, in December, we had a visit from fellow lovespoon carver, David Western and his lovely wife, during their trip to Ohio.  After corresponding with Dave over email for a few years, now, and even having collaborated with him on two lovespoons for the West Coast Eisteddfod, it was a true pleasure to finally meet him in person! He graciously gave a wonderful presentation to a group of my carving friends (and some others) about Lovespoon Carving and History at the Delaware Center for Older Adults. The presentation was thoroughly enjoyed by all, and we all learned a bit, too! Even Chris Watkins from Watkins Lovespoons managed to make it down for the presentations, so it was lovespoon central in Central Ohio on December 4th! (It was lovely to see Chris again, too!)

In mid-November, I also made a trip to Dayton for the annual Artistry in Wood show - one of the largest and best carving shows in the country. There, I happened upon a few boards of Buckeye wood (for anyone who doesn't know, Ohio is "the Buckeye State"). With this new find, I couldn't resist building a spoon for Dave and his wife, to commemorate their tour of the great Buckeye state. It was my first time carving buckeye, and I have to say - I'm sold! It's great stuff - if you have access to it, and haven't tried carving it, what are you waiting for?! It's similar to basswood, I think, but a bit stronger and seems to finish a bit smoother. Anyway... here is the result:
Buckeye often seems to have this lovely spalting... so you have to be careful with it, but it makes for some great contrast and interest! Obviously, I am still having fun with rings.

Meanwhile, I was working on a number of commissions before Christmas, then some Christmas gifts, and more... but among those, probably the most noteworthy is a wine-themed spoon I made out of holly. The symbolism within the spoon also included music, accounting and quantum physics (I was especially pleased with myself for what I thought were clever representations of accounting and quantum physics!). I found this spoon very inspiring, so, as I so often do, I got a bit carried away! Here are a few pictures...


There was one main knot in the mostly clear board (a couple tiny ones elsewhere that I was mostly able to avoid, but one, right in the middle of the lower bunch of grapes - actually, the leaf, on the front. Can't see it yet in the picture above, but here it is on the back (which still didn't look like much at the start - but I'll try to show how it developed as I dug deeper...
and the front...
that's as bad as it got on the front (thank goodness!). But here's what it became from the back:

Then... here is that overall view, a bit further along...

Now, I had warned my client that I'd intentionally drawn in extra tendrils, and even the rings may have proven precarious (though, as it turned out, they were the least of my worries!) - so not to count on the finished carving to be quite the same as the initial drawing. Thanks to the flexibility of my client, I was able to get very daring with a lot of this, and in fact, only one tiny loop near the top had to be sacrificed, but miraculously, all the other tendrils survived! Realizing how precarious my design was, I had to be more conscientious than ever about finishing more aggressive parts before carving away the finer details which would result in weak parts. Ultimately, the center crossing, and the tendril at the lower right of Schroedinger's cat, there were the most fragile parts. That lower tendril - I'm honestly amazed that it survived... goes to show the benefit of using such a hard wood, like holly. So, here are a few pictures around the end of the carving:


You can see, around the middle of the cat, that tendril on the right still touches the box at this point... but, as I cleaned it up and sanded it, that will change...


and the back:

Then, I sanded. As I refined, I ended up freeing that lower tendril, except at the top (about an inch up that other vine), and at the loop near the bottom of the cat... lots of cross-grain sections there that, amazingly, held! Sanding the side of that box couldn't be begun until about 220 grit, because that was the first sandpaper that would fit between the box and tendril, without feeling like it caused too much stress on the tendril! So - long and tedious sanding process, there!... I'll wrap it up now...
Sanding:

Every bit of sanding, and most frighteningly, waxing, I had to support everywhere I touched on the opposite side with a finger. It was VERY flexible, once freed in that middle part. That tendril may still touch the box there, but I assure you, it is free right there at the Cat's knee. It looked like it had a bridge between the tendril and the box before I freed it - so I freed it!  By the way, I only waxed this spoon - no oil - the wax seems to be enough for holly (with a bit heated & melted to soak in a touch), and helps preserve its whiteness, I think.

And finally, all finished up...


I figured this one warranted extra pictures. :) My photography still leaves something to be desired, but... at least I'm trying.

Well - I'm late for something now, and that was probably more than enough for one post, anyway, so I'll say good bye for now, and will try to check in again soon, and see if I can at least get into the new year... ;) Hope all of you are enjoying the new year, meanwhile, and if you carve, then carve someone a lovespoon for Valentine's Day!

Monday, October 15, 2012

New stuff...

Once again, I've been too busy for my own good!
Between postal worrying around the Portland Eisteddfod Lovespoon, trying to build out some new sections on my BlakesPA Website (still working on those!), and trying to rebuild a bit of inventory - among other things - I've been neglecting my little blog here again!

Be sure to take a look at the finished spoon on the Portland Eisteddfod Lovespoon blog, if you haven't yet! Both Dave and I are thrilled with it!

So - the weekend before Labor Day, I was in the Marketplace at the 2012 North American Festival of Wales in Scranton, PA. I'd managed to come up with a few quicker products to offer (note cards, relief-carved boxes, etc.) as well, just so my very small lovespoon inventory wouldn't look quite so sparse all alone on my table! So here's my table...
This was the second day, so my inventory was already dwindling... but I think I'll definitely continue making more relief-carved boxes & such! Here's a closer look at one..

And here's an ornament with a daffodil...

And, of course, I've been doing a bunch of designing... but the MOST fun thing I've done these past couple months was to make a spoon (albeit, a very simple one) with some loose rings on it! Here are a few pictures of that...


Boy - Rings are fun! And, in case you haven't heard me say before that while I like carving balls in cages, I have trouble incorporating them into a spoon design - they are just usually too bulky. Rings, on the other hand - they are VERY easy to incorporate into a design! I see a lot of rings on spoons in the future!

Then, on top of all that, I'm trying to re-make some examples of those workshop spoons from a while back. I sold a couple at the NAFOW, and I'm giving my first full length class at my local WoodCraft store next month, so I still need all my examples!

Well... that's enough for now... I'll hopefully be back sooner next time! Until then - carve a lovespoon!

Thursday, August 9, 2012

My Workspace

Once again, my life being completely consumed by carving projects has kept me away from the blog. Part of that is because I've been spending the few moments I can spare for writing on the Portland Eisteddfod Lovespoon blog, but mostly, I've just been carving A LOT!!! Like, 8-15 hours a day, most days! And, since I've mostly been working on the Eisteddfod spoon (a project with David Western), I was having trouble coming up with a subject to share here, too. Please DO have a look over at that Portland Eisteddfod Lovespoon blog, because I think it's the neatest carving I've ever done.

In my last post here, a commenter asked about my workspace, particularly if I work at a bench, or table, or what, and also about the green mat that you often see in the pictures under my work piece. I actually took a picture of my workspace a couple years ago...

While I was answering that comment on the last post, I realized that I actually get a lot of questions about my workspace, and there are really a lot of considerations, so thought that might be a good topic for a new post here, especially if any newer carvers who may wonder about these things (like I did/do) happen to be reading this.

A couple mornings each week, I do sit at a regular table to carve, either at a rec center or park shelter next to the river... 

Really, most of the time, though, I do most of my carving holding the spoon in my left hand (wearing a kevlar carving glove!!!), in my armchair. That used to be the Lazyboy shown above, but that's in another room now, awaiting re-upholstering because the fabric is too worn, so now my chair is a hand-me-down cushiony leather recliner. Leather is great - especially for sweeping off chips and dust, but I'm starting to think that maybe the sitting position is not quite as supportive as the lazyboy was.  All that said, I do prefer to work at a table as much as I can, especially in certain scenarios. For a little more than 3 years when I started carving, I never even considered carving at a table (it just didn't cross my mind). (Most of that time, I was working way more than full time, so except for the last 7 or 8  months, the carving was pretty infrequent, and not usually more than a few hours at a time) So without giving it much thought, I just sat in my favorite chair, and started carving, holding my work piece in my left hand.

First, a little digression, though - On July 1st, 2009, I went to Washington, DC to see Mike Davies at the Smithsonian Folklife Festival, which was featuring Wales that year. Mike has played a critical role in elevating the Welsh Lovespoon to the fine art it can often be today, and has made lovespoons for people such as the Queen of England. When I first did a quick search to learn about the tradition, I wasn't as interested (though I did think it was a lovely sentiment), until I came upon Mike Davies' website. After a quick look at his site, I decided that there ARE at least SOME people who make an art of it (which made it much more interesting to me), so I ended my search, having been convinced that this WAS a tradition I'd like to try, and wanting to avoid being too influenced by the carvings of others. It wasn't until a year or so later that I took a closer look at Mike's site, and realized just what a rock-star Mike actually is (at least, in the world of lovespoons).  Completely star-struck, I chattered at him all day about who knows what, but also, I just watched him carve. I do remember asking him if he had any advice, and he said to explore and study as many types of carving as I could, because I would learn from them all. But I digress - I gained a WEALTH of information from watching him that day, but probably the biggest revelation for me was that he mostly worked on a table.

So simple, right? But it honestly had never crossed my mind until I saw him. He sometimes used a mallet, too - well - a log, but still - if you can secure the piece on your table, you get the option to use a mallet, too. But, the main advantage I noticed about using a table was the enormous amount of leverage gained, and sparing your left hand. That is why I do PREFER a table, when possible. Still, it doesn't always work for me.

A table provides leverage, but is also in a fixed position. So, if the work can't rest on a table (or be propped into the position I need with a supportive cushion or something under it), then I can't use it. For a lot of my spoons, I have a lot of open space or fretwork, and I like to carve as much "in the round" as I can, which often means constantly turning the piece in every direction while I carve around any given feature. Also, since on my spoons, everything is usually so small, I am not often carving in one position for very long.  So, even when I am carving at a perfect table setup, I still find myself picking up the spoon and working with it in my hand. On that Four Seasons spoon I featured in my last post, however, it was much larger than usual, and also had some large, and relatively flat elements. That allowed a lot more work on a table than usual. Maybe 50%? I usually set spoons on the table when I'm carving the interiors of bowls, carving details in relief, or for scooping away a large amounts of wood (this usually involves a little more pressure than the details, so I also make very sure no other part of the spoon is at risk from being pressed against the table, or the pressure from my tools). Sometimes (even using something extremely flexible like a folded up dish towel), I can't safely and equally support all the areas that would get pressure from either me or the table while I'm carving, so you're carving, so I just hold it in my hand, anyway.

Tables are not that portable. First of all, there isn't a table in the room where I usually carve. You'd think I work in a regular woodworking shop in the basement or something, right? Nope. Carving takes a long time, and I don't like being away from my dogs for a long time if I don't have to be, so I really only use my basement shop (where I don't bring the dogs) for work that would be too loud or messy, or requires large tools that I want to keep down there. So, I'd already decided that the room with my armchair was better. But what to do about a table... Well, the first thing I tried was a wooden serving tray. I could put that on my lap, and still get the leverage of a table, but it was very portable, and even had edges to help contain the chips. This was a nice idea, but I quickly found that even if the spoon was small, the tray still was pretty limited in how I could move it around, so I'd not only have to move my spoon, but also the tray, which is, well, less than ideal. I needed a bigger surface, or at least one without an edge on every side. I also considered a folding card-table, and a folding TV table. Both of these worked well enough, and were an ok height when I sat on the edge of the armchair. The portability is great, at least for that room, and they are stable enough for carving. If I think I'll need a table when I carve elsewhere, I can always bring the tray, or, a friend made me a lap table that is a little bigger than the tray, has sides I can hold with the outsides of my legs, and even has a handle, so it's also a great option. Even when I hold my carving in my hand, though, a surface comes in handy for holding tools, etc.

Tables are smooth and slippery, and made of WOOD. Next to consider was that, even if I held down my work with my left hand (which I pretty much always do), the work likes to move around on the table. Also, I didn't really want to destroy whatever table or tray I was carving on, and likewise, didn't want the hard wooden surface to mar or break some detail on the side of my work piece that may have already been carved, and was resting against the table. So, I got a side of medium/heavy leather on clearance from a leather supplier (I don't know - maybe $30?), and I cut a rectangle (near the size of the surface of a TV table), and use it like a bench hook. I also made some sheaths for some of my tools (like my bent knife), and some multi-tool pouches that hold my favorite tools. I've given away a couple other rectangles to some friends to use as carving mats, too, and I still have about half of the leather left, so when I wear out this rectangle, I can just cut another. You can also get sample leather (usually about 8x10) from leather suppliers really really cheap. This one probably has a couple years left, at least. The leather happens to have a nu-buck finish, which I think is especially good, though I think most other finishes would also be fine. A lot of people I know use that rubberized foam mesh/web shelf liner in the same way. It works well as a bench hook, but doesn't protect things as well as the leather does. Also, when I'm done carving, I roll up my spoon(s) in the leather, and it fits nicely in my little carving tote, and it's firm enough to protect delicate spoons and pointy edges from the other perils or pressure from other things in transit. So that's all good. Maybe one of these days I'll glue a bit of leather to my TV table to have a built-in strop, too, so I quit knocking it off the edge of the table like I do now.

Chips? They are easy enough to sweep up, but then, I'm not a neat freak, and my husband seems to love me anyway. I know - it's a mystery to me, too. But, in all seriousness, when I carve on a table, most chips stay there, and the table is out in the middle of the room enough so it's even easy to sweep up most of the flyers. And, the ones that land on me (most of them, when I'm carving in my hand), fall or get brushed off when I stand up, and again, are in the middle of the room and easy enough to sweep up. Admittedly, though, there are probably a few chips under every piece of furniture in this room, and probably in other rooms, too. But, even if I carved in the basement, I would probably leave a trail of chips around the house.
But my setup is still not ideal. It's pretty good, but not perfectly ergonomic. Maybe eventually I'll set up a carving desk, and get a proper chair that has a comfortable seat and is exactly the right height for my legs, and also doesn't make me have to lean way over my work, as I have a tendency to slouch, anyway.

No matter how perfect my setup is, I have to always try to remember my posture, and remember to frequently stop to look across the room so I don't strain my eyes, and stretch my hands and rest my wrists, and get up and stretch my legs.... and I keep finding myself with my legs crossed and my head tilted, which seems to be creating some nerve issues - your spine is very important. I have to keep thinking "ballerina/carver! ballerina/carver!" and maybe take up archery again, too.

Anyway, I think I'm procrastinating. I've got several spoons and about a zillion pens I'm turning that I should get back to working on now. Maybe next time I'll have something to talk about that I won't drone on and on and on about.... until then, have fun carving, or doing whatever you do!

Saturday, June 16, 2012

Busy, busy, busy!

Well, I know I said I was going to try to be more regular in posting here, but this past month, I just haven't had the time. Today, though, my dog and I are recovering from a week of being very sick, so I thought I'd try being at least a little productive, and write something here! Here's one product from the past few weeks:


But I'll come back to this one... First, I should touch on a few other bits of fun from the past few weeks!

So, I spent some of the time to help finalize the design for the Lovespoon collaboration with David Western and two other artists. It is to be raffled off for Americymru's West Coast Eisteddfod; I participated in the always fun Celtic Beltane Festival in Hartville, Ohio; and I worked on some lovespoon commissions, too.

At the Celtic Beltane Festival, we lucked out and had a beautiful day of weather! I saw a lot of familiar faces, and for the first time, I was able to break away for a bit, and watch a friend of mine participate in the Caber Toss - he even did his first perfect throw! Those Highland Games guys are serious rock stars, if you ask me. Wow - that was fun to watch! Here's my little booth, with the few simple spoons that remained near the end of the day. You can also see more about it and other Ohio festivals at this nifty website all about Ohio festivals!


You may be able to see the little spoon I'm working on, there on the left side of the table. More about that later... Here are a few pictures of a couple of other commissions I finished in the last month:

A lovespoon commissioned as a gift for some folks in France...

Then, another commission for a first wedding anniversary (the "paper" anniversary)...


Maybe later I'll come back and share a few of the challenges that I encountered on these. For now, though, I feel more like discussing that little white spoon from above... This was a lot of work - you can probably just scroll through the pictures, but I added in some notes, just in case anyone might be curious. So - be warned - this is another long one!

Anyway, this was a commission for a tenth anniversary. The person who commissioned it had lots of ideas to include in the spoon, and even though I knew I was over-designing it a bit, I was inspired, and my client was really excited about the spoon, so I allowed myself to get carried away in the design, and probably included many more elements than I should have. One of the bits of heritage he offered to be included was Pennsylvania Dutch, which has its own tradition full of symbolism called "Hex" (or maybe Hechs) signs. So I designed and incorporated one of those, as well, which meant an area of relief carving some fine details, which actually allowed me to somewhat concisely include a few additional bits of symbolism. I'm not going to go through all the symbolism here, though. Suffice it to say - this one is PACKED FULL of meaning.

One interesting challenge that comes with commissions is estimating the time they will take. On this one, I knew I was significantly over-designing it, but I didn't care - it was fun! But I still kept careful track of the time I spent, so I would know how good my estimating is getting - and I'm pleased to report I finished it only 1.5% over my estimate!!! So, I've apparently gotten pretty good at estimating. The main themes in this spoon, anyway, are all seasons, a few different kinds of heritage, family, and faith. (and that's just the general stuff)

So - Here are - well - LOTS of pictures showing the progression of this spoon... starting with cutting the blank from a 1" thick holly board. I really love holly, but it's hard (so cuts and carves very slowly!)


In this picture, it isn't all the way cut, but you get the idea. This was about 2 hours into the sawing. Later I decided that next time I do a sunflower, I don't think I'll cut the petals - just the circle, instead. It's  just not necessary, and I think the flexibility of not defining the petals until later would be better.

Then, I got into the carving. Here it is after 10 hours...


I tried to start in some of those areas that were a little challenging to reach, just to get them out of the way. However, I also didn't go far with that Moravian Star at the top, because I figured carrying it around, I'd break off some of the corners, so I didn't want it to be the finished corners that I would inevitably break! Luckily, though, holly is so strong, and I was careful enough, that even those rough corners survived pretty well, until I cut them away near the end. Deciding the depth of everything was one of the big challenges, knowing that I'd eventually cut away a lot of the back of most of the spoon. With most parts, I managed to cut down the levels pretty much how I wanted, up front, but with that darn sunflower, I kept changing my mind. So I probably spent maybe as much as ten extra hours, just changing my mind and re-carving that whole thing to make it lay on a slightly different plane. In hindsight, I'd have been better-off had I just cut down the surface of a plain circle, until I liked where it was, and THEN drew in and carved all the detail of the petals. Live and learn. :)

Well, here are a few more pictures as it progressed...


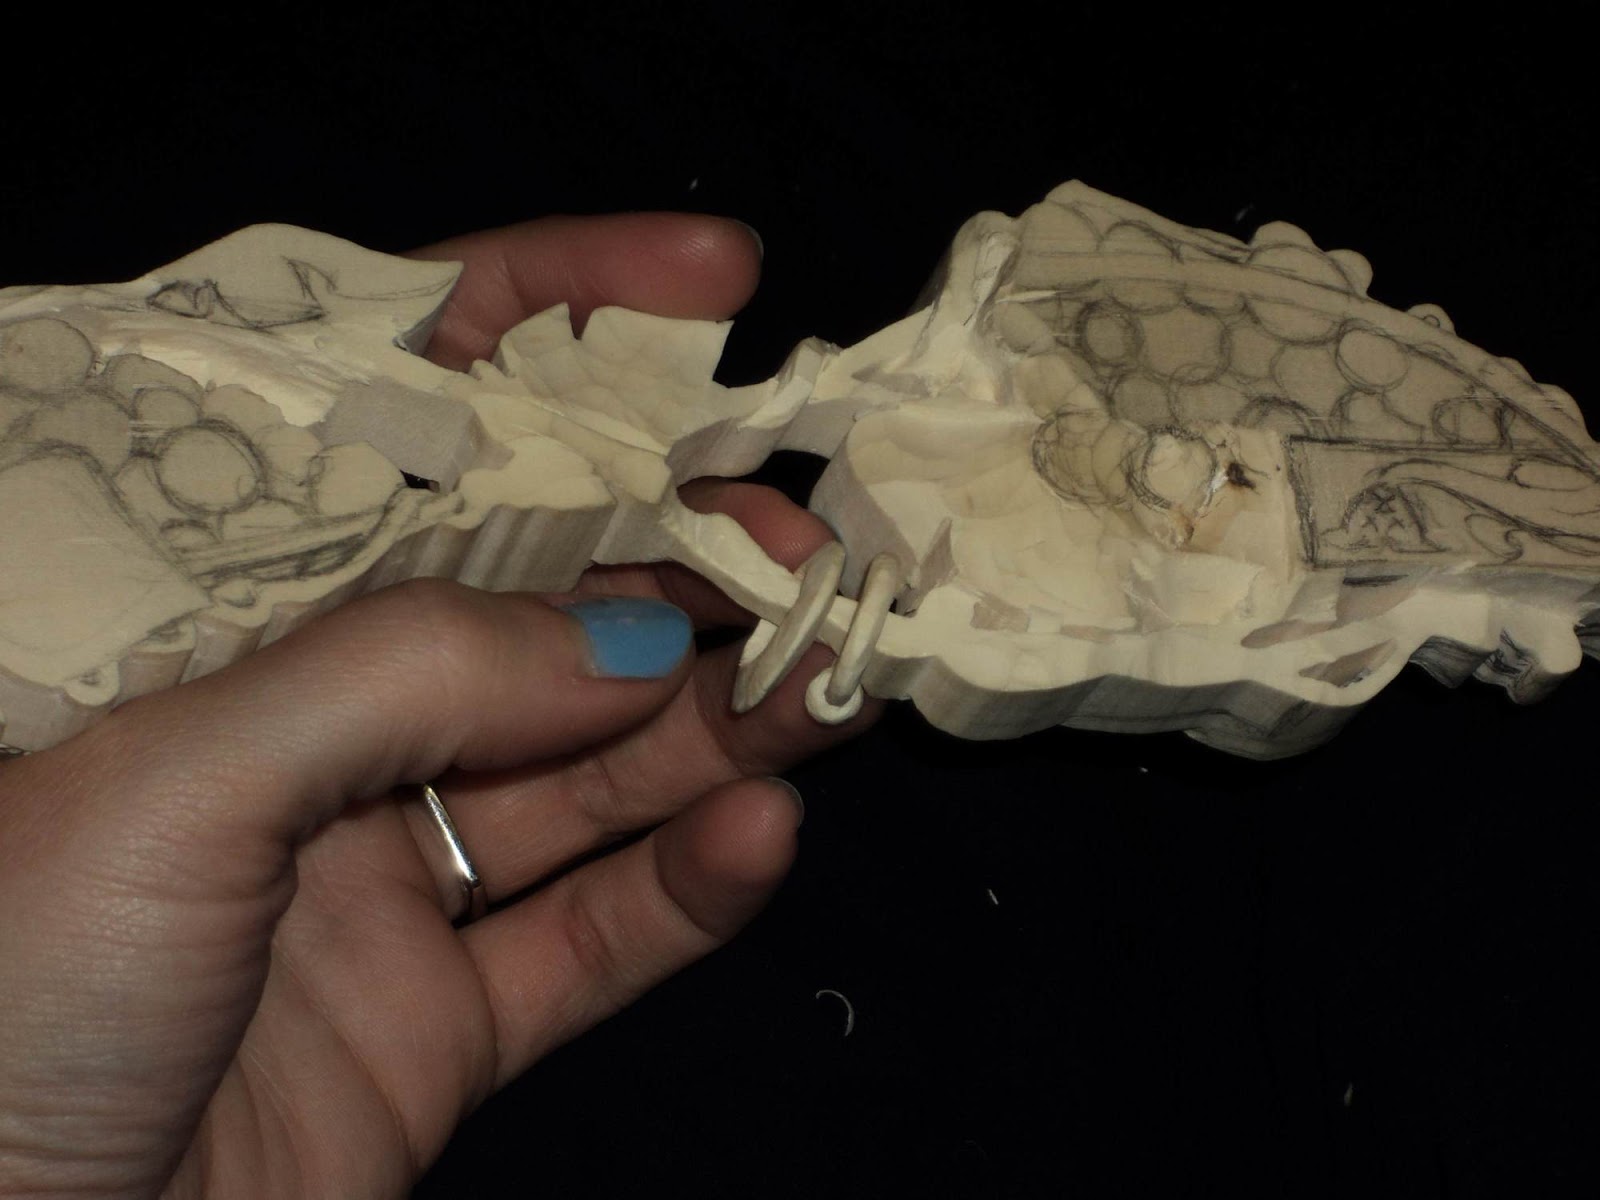
So, except for scooping out most of the bowl, and working on that star, the front was mostly where I wanted it. (Well - and that sunflower - it changed yet a few more times...) So, now it was time, I thought, to get down to it with that star. It was an interesting challenge, because it's normally a spherical thing, so I had to kind of make up how I wanted to represent it in this "squished in-the-round" format. It couldn't be literal, but you still had to know it was a Moravian Star. Also, I'd need to be very careful once I carved away to where all those points actually would be, as points are always very fragile.


And then, I thought I'd save the undercutting of those front layers of the star until later - to at least give the points a little support until I absolutely had to take them off. You'll notice those front points aren't all quite even lengths, either - I figured I can make those more even when I undercut them. For now, then, on to the bowl! When I think of it, I usually like to start with the outside (backside) of the bowl.


That took about 2 hours... and then, on to all the rest of that extra wood to take off of the back! Boy - that's a lot of very hard wood!


Before I go too far, though, there's a lot of interweaving of stems and leaves and a cross down in that section above the bowl, so a lot of fully 3D sculpture. And once again, I just made up something for the back of the star, and put it off until later...

With the back of that Hex sign, though, this was one of the first time I really thought some sort of power carving might be a good idea. Usually I have too many dimensions and details interweaving through the back sections, too, but the back of that circle really didn't need detail, so if I'd wanted, I wouldn't have felt too bad (and probably would have saved a couple hours of work) to have power-carved away some of that waste. But, instead, I just used my trusty gouges.


And then I didn't take pictures for a while... and just worked at those tulips surrounding the cross....


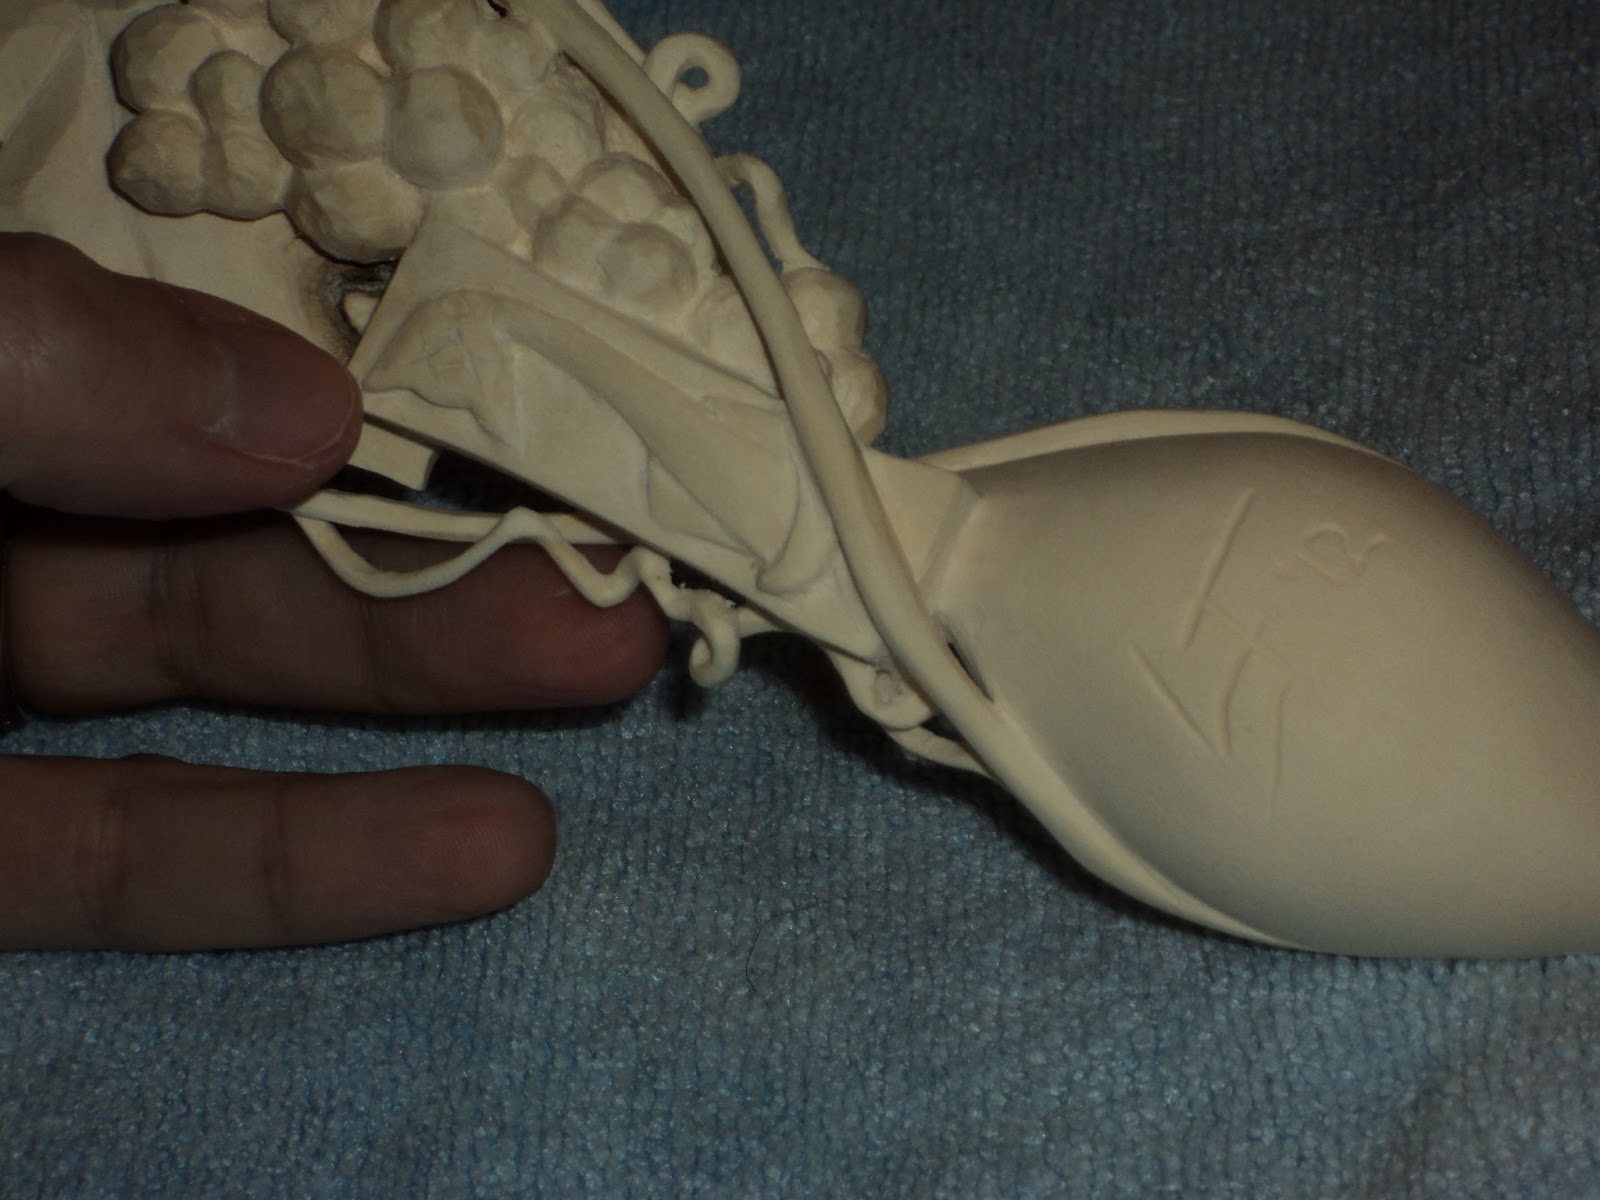
So, now we're really just about there... Here we are with all the carving complete, and even a touch of the sanding begun...


But, then, the bowl is still pretty clunky... the rest of it is probably about a third of the mass it once was... So - as a last step, just to finish scooping out the bowl, so it's pretty thin and relatively even all over. Another hour, and I'm just about there. I do end up leaving it somewhat thick near the top of the bowl, just to give it a bit more strength, and also because I just liked the shape at that point.


And then - many many hours of sanding. Lots of details, lots of points to avoid breaking, and lots of grits of sandpaper to go through! Meanwhile, my dog got deathly ill.... so a lot of sanding was done waiting around at the Veterenary hospital... good thing I thought to bring it along!

Anyway, I sanded to about 600 grit, then doused the whole thing in water to bring up some fibers. Usually it doesn't take long to dry, but holly seems more thirsty than a lot of other woods, so it really took a long time to dry. Once it dried, though, I had another pass with the 600 grit, then went on through the rest, all the way to 12,000. Here's what it looked like, sanded:


Such a pretty, creamy color this holly has. Now, usually, I'd finish with both oil and wax, but I've been talking to some people about finishing things in just wax, and I thought this was an occasion that really called for that.
So here it is, finished...


Notice the strange mark - it's apparently a knot - that runs the whole length of the spoon. I guess I didn't think knots would run that long. This is 18 inches long - that seems like a long knot to me, but I don't know much about how they form, so - maybe it's not strange after all. Anyway, you only see it on the back of the star and the bowl, because it was only about 1/4 inch deep, from the back plane of the board. Everywhere else, I carved away between 1/4 and 1/2 inch of the back of the board.


So, there you have it - from beginning to end...